Bee Mine Oreo Cookies Recipe
Introduction
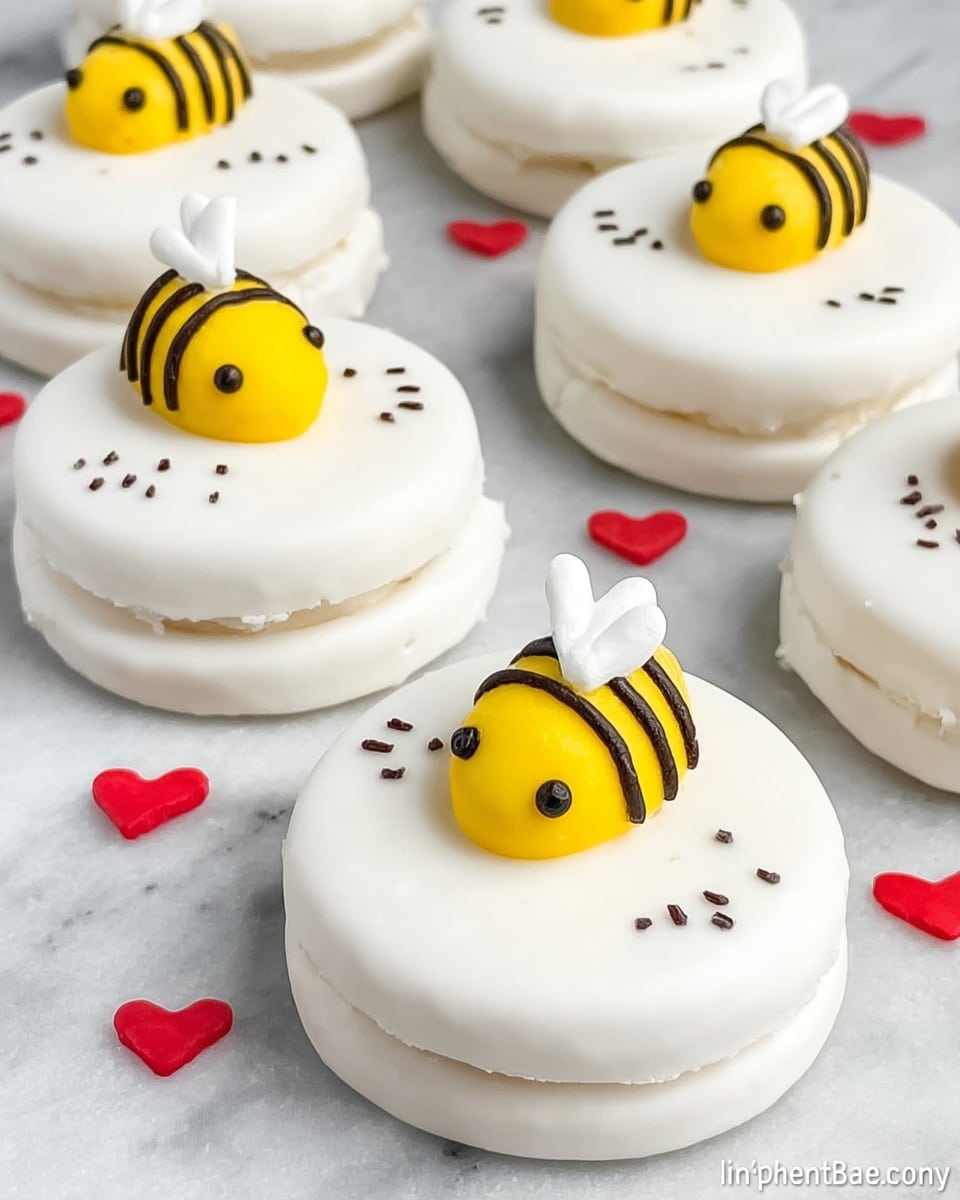
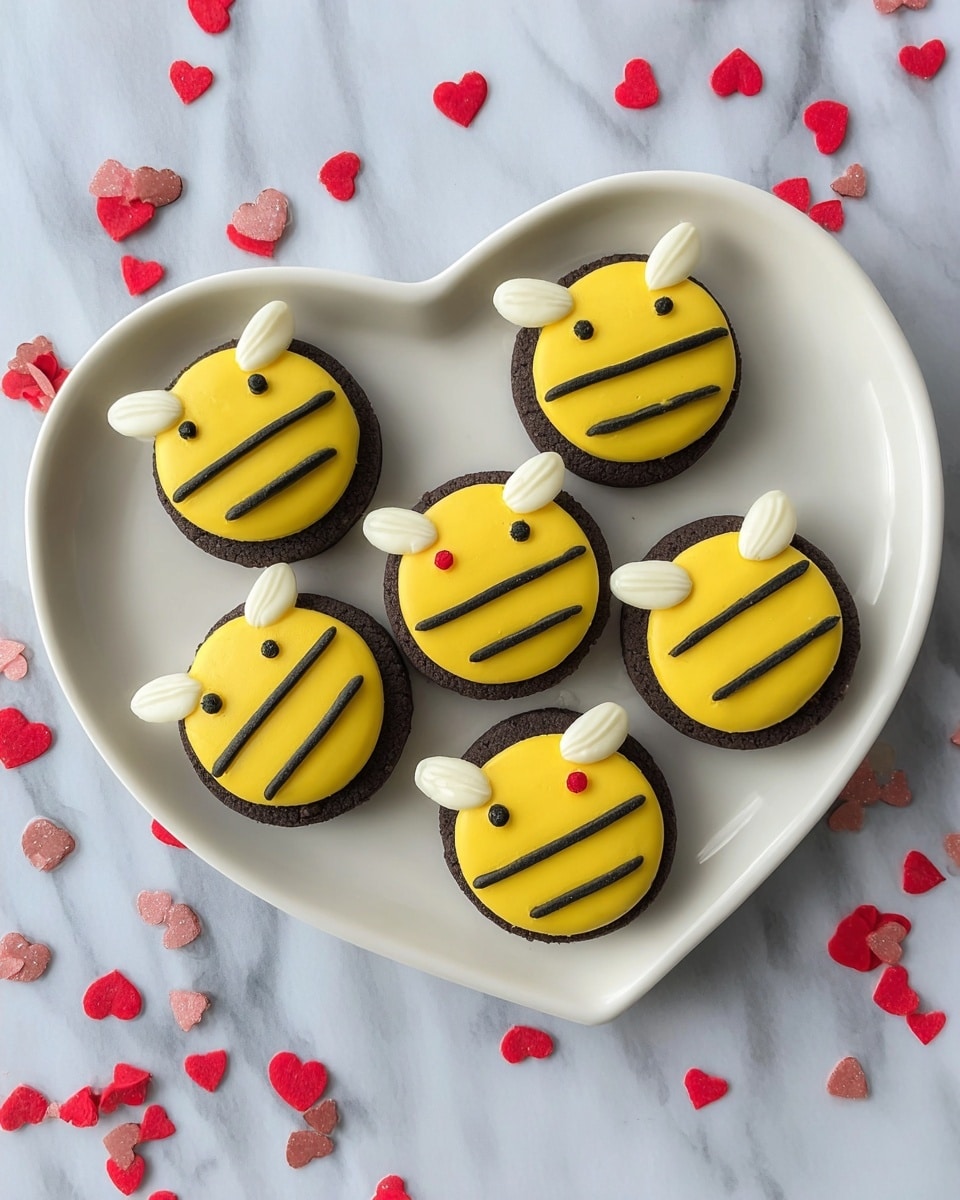
These Bee Mine Oreo Cookies are a fun and adorable treat perfect for sharing with loved ones. Each cookie is dipped in creamy white candy coating and decorated with a cute fondant bee and heart accents. They’re as delightful to look at as they are to eat!
Ingredients
- 1 (12 oz.) package white candy coating
- 12 Oreo cookies
- Yellow fondant
- Black edible food coloring marker
- Red heart sprinkles
- White heart sprinkles
Instructions
- Step 1: Melt the white candy coating in the microwave following the package instructions until smooth and pourable.
- Step 2: Pour the melted coating into a deep container. Dip each Oreo cookie completely into the coating, ensuring it is fully submerged.
- Step 3: Lift the cookie out using a fork and gently tap it against the container to remove any excess coating.
- Step 4: Carefully slide the coated cookie onto parchment paper to set.
- Step 5: Roll yellow fondant into 12 oval-shaped balls, about 1/2 inch in size, to form the bees’ bodies.
- Step 6: Using the black edible food coloring marker, draw stripes and two dots for eyes on each fondant bee.
- Step 7: Attach two white heart sprinkles to each bee to serve as wings, using a toothpick dipped in melted white candy coating to stick them in place.
- Step 8: Secure each fondant bee on top of the coated cookies with a small amount of melted white candy coating.
- Step 9: Attach a red heart sprinkle on the opposite side of the bee on each cookie, again using melted white candy coating.
- Step 10: Allow all decorations to dry completely. Once dry, use the black edible marker to draw dashed lines from the bee to the red heart, mimicking a flight path.
Tips & Variations
- For easier handling, chill the dipped Oreos in the refrigerator for a few minutes before decorating.
- You can substitute yellow fondant with yellow modeling chocolate or colored white chocolate.
- If you don’t have an edible marker, use a fine paintbrush and black food coloring gel to create stripes and eyes.
- Try using different colored heart sprinkles to customize for various occasions.
Storage
Store the decorated cookies in an airtight container at room temperature for up to 3 days. Avoid refrigerating as moisture can cause the candy coating to become sticky. If needed, reheat gently in a warm, dry place to restore crispness.
How to Serve
Serve this delicious recipe with your favorite sides.
FAQs
Can I use other types of cookies besides Oreos?
Yes, any sandwich cookie with a similar shape and size will work well for dipping and decorating.
How do I prevent the candy coating from cracking?
Make sure the melted candy coating is poured at the right temperature—not too hot or cold—and avoid thick layers on the cookies. Tap off excess coating and allow to set on parchment paper for best results.
PrintBee Mine Oreo Cookies Recipe

These Bee Mine Oreo Cookies are a delightful and charming treat perfect for gift-giving or special occasions. Oreo cookies are dipped in creamy white candy coating, then decorated with adorable hand-crafted bees made from yellow fondant and detailed with edible markers and heart-shaped sprinkles. The result is a whimsical combination of sweet flavors and cute designs that will impress friends and family.
- Prep Time: 30 minutes
- Cook Time: 0 minutes
- Total Time: 30 minutes
- Yield: 12 decorated cookies 1x
- Category: Dessert
- Method: No-Cook
- Cuisine: American
Ingredients
Cookies and Coating
- 1 (12 oz.) package white candy coating
- 12 Oreo cookies
Decorations
- Yellow fondant (enough to roll twelve 1/2 inch oval shaped balls)
- Black edible food coloring marker
- Red heart sprinkles
- White heart sprinkles
Instructions
- Melt the Candy Coating: Begin by melting the white candy coating in the microwave as per the package instructions until smooth and fluid.
- Dip the Oreos: Pour the melted coating into a deep container. Submerge each Oreo cookie completely in the coating using a fork, then tap the fork against the container to remove any excess coating.
- Set the Coated Cookies: Carefully slide each coated cookie onto parchment paper and allow the coating to set until firm.
- Create Fondant Bees: Roll yellow fondant into twelve oval-shaped balls approximately 1/2 inch in size to form the bodies of the bees.
- Decorate the Bees: Use a black edible food coloring marker to draw bee stripes and two dots for eyes on each fondant bee.
- Attach Wings: Use a toothpick dipped in melted white candy coating to affix two white heart sprinkles onto each fondant bee to resemble wings.
- Place Bees on Cookies: Using melted white candy coating as glue, attach each fondant bee to the top of a coated cookie.
- Add Heart Sprinkles: Also affix a red heart sprinkle on the opposite side of the bee on each cookie with melted white candy coating.
- Let Dry Completely: Allow all decorations to dry fully so they are secure.
- Draw Bee Lines: Once dry, use the black edible marker to create dashed lines connecting the fondant bee to the red heart, simulating a bee’s flight path.
Notes
- Ensure the candy coating is smooth and not overheated to avoid clumping.
- Work quickly when attaching decorations before the coating hardens.
- If fondant is sticky, dust with a little cornstarch to make it easier to roll.
- Store finished cookies in an airtight container to keep them fresh.
- These cookies can be customized with different colored fondant or sprinkles for various occasions.
Keywords: Oreo cookies, white candy coating, fondant bees, Valentine’s Day treats, decorated cookies, no-bake dessert