Creamy Biscoff Cookie Butter Cheesecake Recipe
Introduction
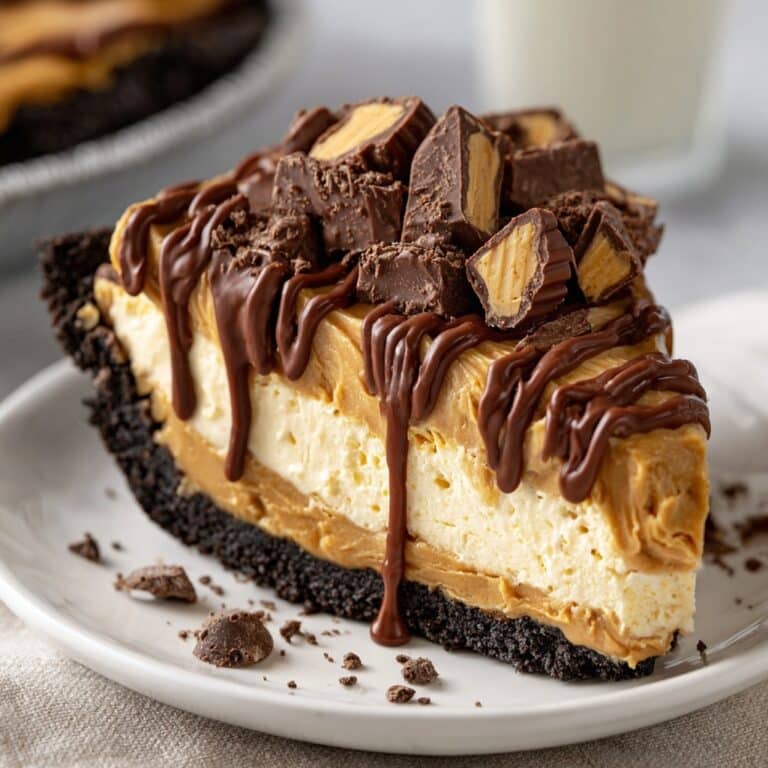
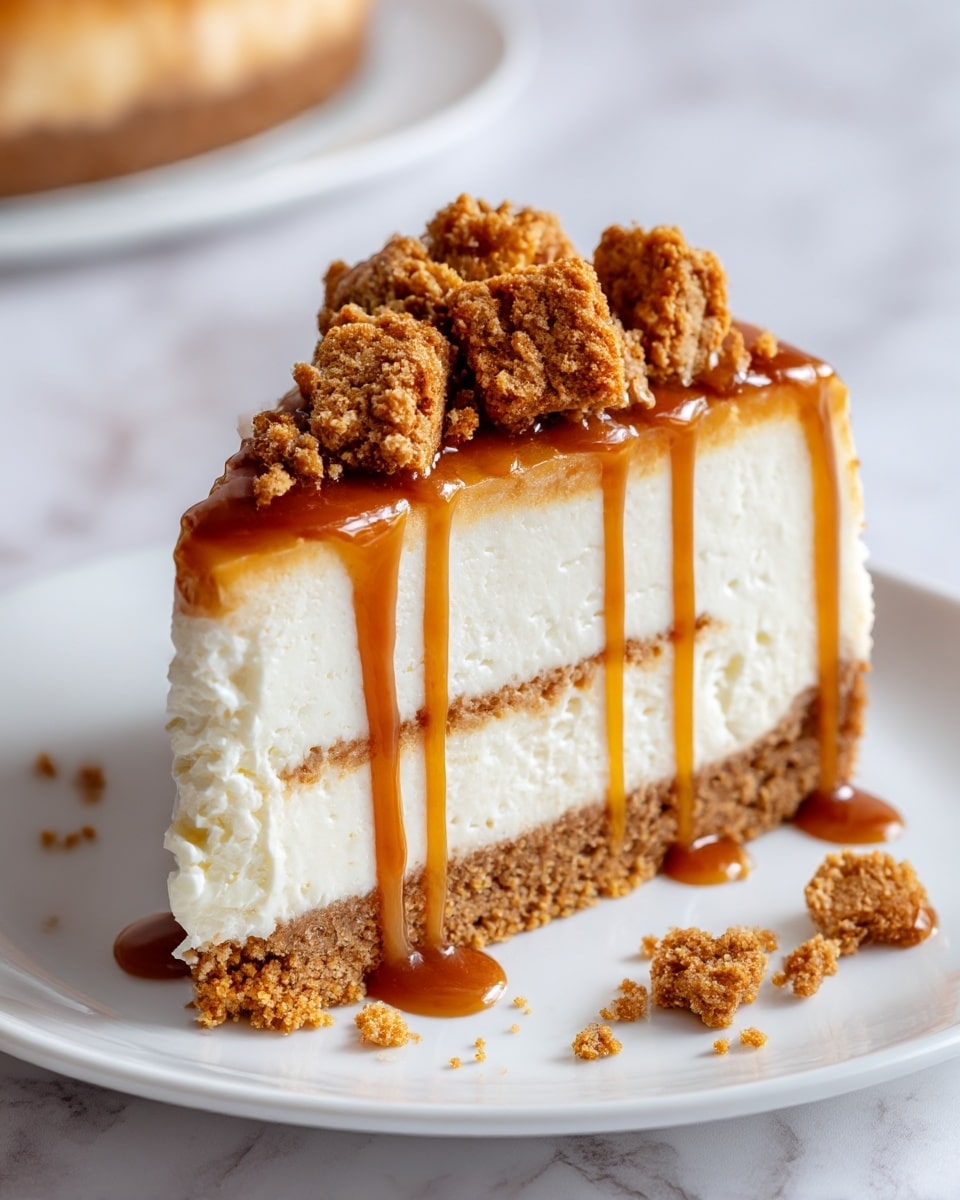
This Creamy Biscoff Cookie Butter Cheesecake is a luscious dessert that combines the beloved caramelized flavor of Biscoff cookies with a smooth, velvety cream cheese filling. Perfect for any occasion, it offers a rich yet balanced sweetness that’s sure to impress your guests.
Ingredients
- 1 1/2 cups (150g) Biscoff cookies, finely crushed (or graham crackers as a substitute)
- 6 tablespoons (85g) unsalted butter, melted
- 2 tablespoons granulated sugar (optional)
- 16 oz (450g) cream cheese, softened
- 1 cup (260g) Biscoff cookie butter, room temperature
- 3/4 cup (150g) granulated sugar
- 3 large eggs, room temperature
- 1/2 cup (120ml) sour cream
- 1 teaspoon vanilla extract
- Pinch of salt
- For topping (optional): 1/4 cup (65g) Biscoff cookie butter, warmed slightly for drizzling
- Whipped cream or crushed Biscoff cookies for garnish
Instructions
- Step 1: Preheat the oven to 325°F (160°C). Crush Biscoff cookies into fine crumbs using a food processor or by placing them in a zip-top bag and rolling with a rolling pin.
- Step 2: In a bowl, mix the cookie crumbs with melted butter and optional sugar until the mixture resembles wet sand.
- Step 3: Press the crumb mixture firmly into the bottom of an 8-inch springform pan to create an even layer. Compact tightly using the bottom of a glass.
- Step 4: Bake the crust for 10 minutes, then remove from the oven and let it cool while preparing the filling.
- Step 5: In a large bowl, beat the softened cream cheese until smooth and free of lumps.
- Step 6: Add granulated sugar and beat until the mixture is creamy.
- Step 7: Add Biscoff cookie butter and mix until fully incorporated, making sure there are no lumps.
- Step 8: Beat in the eggs one at a time, mixing just until combined after each addition to prevent overbeating.
- Step 9: Gently fold in sour cream, vanilla extract, and a pinch of salt using a spatula until the mixture is smooth and silky.
- Step 10: Pour the filling over the cooled crust and smooth the top. Tap the pan gently on the counter to release any air bubbles.
- Step 11: Bake the cheesecake at 325°F (160°C) for 50-60 minutes, or until the edges are set but the center still has a slight jiggle.
- Step 12: Turn off the oven and leave the cheesecake inside with the door slightly ajar for 1 hour to cool gradually.
- Step 13: Transfer the cheesecake to the refrigerator and chill for at least 4 hours or preferably overnight.
- Step 14: Before serving, warm the Biscoff cookie butter slightly and drizzle it over the top. Garnish with whipped cream or crushed Biscoff cookies if desired.
Tips & Variations
- For a gluten-free crust, substitute gluten-free cookies for Biscoff or graham crackers.
- Ensure all dairy ingredients are at room temperature to achieve a smooth and lump-free filling.
- Use a water bath during baking to help prevent cracks in the cheesecake for an even smoother texture.
- Try swirling melted chocolate into the filling before baking for an extra decadent touch.
Storage
Store the cheesecake in the refrigerator, covered tightly with plastic wrap or in an airtight container, for up to 4 days. For longer storage, you can freeze it for up to 1 month; thaw in the refrigerator overnight before serving. When ready to eat, let it sit at room temperature for about 20 minutes or enjoy chilled.
How to Serve
Serve this delicious recipe with your favorite sides.
FAQs
Can I use a different type of cookie instead of Biscoff?
Yes, you can substitute graham crackers or any similar spiced cookies if you don’t have Biscoff cookies on hand. Keep in mind the flavor may be slightly different but still delicious.
How do I prevent cracks on my cheesecake?
To avoid cracks, avoid overbeating the eggs and consider baking your cheesecake in a water bath. Also, allow it to cool gradually in the oven with the door slightly open before refrigerating.
PrintCreamy Biscoff Cookie Butter Cheesecake Recipe

This creamy Biscoff Cookie Butter Cheesecake combines a rich, velvety cream cheese filling with the iconic caramelized flavor of Biscoff cookie butter, all atop a crunchy Biscoff cookie crust. Perfectly baked to achieve a smooth and luscious texture with a slight jiggle in the center, this dessert is a decadent treat for cookie butter lovers and cheesecake fans alike.
- Prep Time: 20 minutes
- Cook Time: 1 hour 10 minutes
- Total Time: 5 hours 30 minutes
- Yield: 8 servings 1x
- Category: Dessert
- Method: Baking
- Cuisine: American
Ingredients
Crust
- 1 1/2 cups (150g) Biscoff cookies, finely crushed (or graham crackers as a substitute)
- 6 tablespoons (85g) unsalted butter, melted
- 2 tablespoons granulated sugar (optional)
Filling
- 16 oz (450g) cream cheese, softened
- 1 cup (260g) Biscoff cookie butter, room temperature
- 3/4 cup (150g) granulated sugar
- 3 large eggs, room temperature
- 1/2 cup (120ml) sour cream
- 1 teaspoon vanilla extract
- Pinch of salt
Topping (optional)
- 1/4 cup (65g) Biscoff cookie butter, warmed slightly for drizzling
- Whipped cream or crushed Biscoff cookies for garnish
Instructions
- Preheat and Prepare Crust: Preheat your oven to 325°F (160°C). Crush Biscoff cookies into fine crumbs using a food processor or by placing them in a zip-top bag and crushing them with a rolling pin.
- Mix Crust Ingredients: In a bowl, combine the crushed cookie crumbs with the melted butter and optional sugar until the mixture resembles wet sand.
- Form the Crust: Press the crumb mixture firmly and evenly into the bottom of an 8-inch springform pan. Compact tightly using the bottom of a glass to ensure a solid base.
- Bake the Crust: Bake the crust in the preheated oven for 10 minutes. Remove from the oven and allow it to cool while you prepare the filling.
- Beat Cream Cheese: In a large bowl, beat the softened cream cheese until smooth and free of lumps.
- Add Sugar: Add the granulated sugar to the cream cheese and continue beating until creamy.
- Incorporate Cookie Butter: Add the Biscoff cookie butter and mix thoroughly until fully combined and smooth.
- Add Eggs: Beat in the eggs one at a time, mixing just until combined after each addition to prevent overbeating and ensure a smooth texture.
- Fold in Remaining Ingredients: Gently fold in the sour cream, vanilla extract, and a pinch of salt using a spatula until the batter is smooth and silky.
- Assemble and Prepare for Baking: Pour the filling over the cooled crust and smooth the top evenly. Tap the pan gently on the counter to release any air bubbles.
- Bake the Cheesecake: Bake at 325°F (160°C) for 50-60 minutes. The edges should be set while the center still has a slight jiggle when gently shaken.
- Cool Gradually: Turn off the oven and leave the cheesecake inside with the door slightly ajar for 1 hour to cool gradually and prevent cracking.
- Chill: Remove from the oven and refrigerate the cheesecake for at least 4 hours or overnight to fully set.
- Add Topping and Serve: Before serving, warm the Biscoff cookie butter slightly and drizzle it over the cheesecake. Garnish with whipped cream or crushed Biscoff cookies if desired.
Notes
- Using room temperature eggs and cream cheese helps achieve a smooth, lump-free batter.
- Gradual cooling in the oven minimizes cracking on the cheesecake surface.
- Chilling overnight yields the best texture and flavor.
- If Biscoff cookies are unavailable, graham crackers are a suitable substitute for the crust.
- Adjust sugar amounts based on personal sweetness preference; sugar in crust is optional.
- For easier removal, run a knife around the edge of the pan before releasing the springform.
Keywords: Biscoff cheesecake, cookie butter cheesecake, creamy cheesecake, baked cheesecake, Biscoff cookie crust, dessert recipe